Exporting Brushes from Photoshop
If you’re a long-time user of Photoshop you likely have a collection of your favorite brushes, either made by you or downloaded from the internet. You can now save these brushes from Photoshop and put them into Clip Studio for your use.
Note that from what I’ve tested so far, this process is not perfect. You will likely still have to tweak the imported brushes a bit after transferring them from PS to CSP. But this process will transfer the brush tip material and basic brush information from one program to the other, making it much faster than having to recreate and resave brush materials!
Exporting your brushes from Photoshop is not a difficult process. For this example, I will be saving the “Wet Media Brushes” presets from Adobe Photoshop CS4. Note that when you save brushes from Photoshop, you will save all the presets that are currently loaded in your brush window. That means that if you save a set of brushes that has 50 tools in it, when you transfer that ABR file to CSP you will be loading 50 brushes. If you want to only save and import a few brushes at a time, you will have to change your loaded brushes to just those tools.
From the brush menu in Photoshop, click on “Save Brushes…” as shown above to save the current brush presets to a file. Select the location to save the brushes and type in a file name. Once you’ve completed this step you will have an .abr file that contains your PS brushes, and that is what we’ll use to move these tools to Clip Studio in the next section.
Side note, if you want an easy way to save a single brush from PS, these directions from DustinPerkins.com seem easy and straight-forward!
http://www.dustinperkins.com/ashcan/saving-a-single-brush-in-photoshop/
http://www.dustinperkins.com/ashcan/saving-a-single-brush-in-photoshop/
Шаг 5. Настройка Color Dynamics
Мы получили достаточно неплохой результат с формой и количеством. Настоящий листопад! Пришло время задать цвет. Как вы помните, инструмент Brush (Кисть), а именно
ее мы моделируем, зависит от цвета Foreground (Основной) 1 . По умолчанию он черный, и если мы ничего не изменим, то все наши шикарные листья так и останутся
черными. Щелчком в левой части палитры активизируйте параметр Color Dynamics (Динамика цвета).
Изменение цветовых параметров происходит согласно модели HSB.
Если мы хотим смоделировать цвета осени, то базовый цвет (Foreground) необходимо выбрать желтым или оранжевым и задать разброс параметра Hue Jitter (Колебание
цветового тона) 20% относительно этого цвета.
Если величина Hue Jitter (Колебание цветового тона) окажется больше 20%, то будет увеличен диапазон используемых цветов, и осень будет не совсем реальной. Изменения цвета каждого листа в версиях до CS6 применялись сразу к мазку.
В данной версии изменение будет происходить за следующее движение. Поэтому для изменения всех кленовых листьев за каждый проход кистью дополнительно включим флажок Apply Per Tip (Применить для кончика).
Также можно изменять параметры Saturation Jitter (Колебание насыщенности) и Brightness Jitter (Колебание яркости) для комбинирования насыщенности и яркости
цвета относительно выбранного базового цвета.
1. Задайте цвет Foreground (Основной) оранжевым, выбрав его щелчком в палитреSwatches (Образцы).
2. Проведите кистью по документу.
C. Moving a Brush from one Library to another
I said in the lavender box at the top of this page that we can’t do this. Well, we can’t in a technical sense, but we can in a practical sense. Here we go.
Suppose you have an Assorted Brushes Library crammed full of all kinds of brushes — ones that came with PS, ones you made whilst you were painting a nature scene, a text brush you want to have around to reuse, your copyright brush, and some brushes you have made for photo-retouching.
And suppose you have other Libraries which are in similar shape? Is it possible to consolidate all the text brushes into one Library, all the natural textures into another, and all your retouching brushes into a third? Yes!
You will do this by making one huge Library consisting of each smaller Library containing brushes you want in your new collection.
1. Click the Brush Preset Picker dropdown. Then click its flyout.
2. From the listing there (see at right), choose a Library that has brushes you want to have (or choose Load Brushes).
3. For each Library choice, click Append in the dialog box.
This combines all the brushes into your Brush Preset Picker.
At the right, I’ve appended three different Libraries, each of which has something I want in my new collection.
Now Alt-click any brushes you do not want in this new Library. You’ll see little scissors, telling you that the brush is about to be cut.
Auto Masking (Автоматическое маскирование)
BackfaceMask (Маскирование граней на обратной стороне)
Если вы работаете с моделью, имеющей тонкие края — задействуйте Backface Masking (Маскирование граней на обратной стороне). Backface Masking маскирует области, которые обращены в сторону от текущего места скульптинга. Это сохранит детали и форму в областях, которые обычно не видны при скульптинге.
При включенной опции Backface Masking области модели, отбращённые от пользователя, не будут случайным образом затронуты скульптингом. Это может быть очень полезно, например, когда вы пытаетесь ваять одну из поверхностей тонкой модели, такой как кусок кожи. Без применения BackfaceMask любой радиус кисти, превышающий толщину кожи, также окажет воздействие и на противоположную сторону модели кожи. Чтобы настроить эффект используйте слайдер Intensity (Интенсивность). Опция Backface Masking Curve (Кривая Маскирования граней на обратной стороне) предоставляет возможность ещё более тонкой настройки эффекта
Обратите внимание, что это АВТОМАТИЧЕСКИЙ эффект; маска не будет показана, и она будет динамически изменяться по мере изменения формы модели.
BackMaskInt (Интенсивность маскирования граней на обратной стороне)
Когда BackfaceMask (Маскирование граней на обратной стороне) включен, этот слайдер определяет максимальный размер маскировки, который будет применен к автоматически замаскированным областям модели.
BackMaskCurve (Кривая Маскирования граней на обратной стороне)
Маскирование граней обратной поверхности автоматически срабатывает в зависимости от угла, под которым они находятся от пользователя. Настройки Backface Masking Curve, применяемые по умолчанию, хорошо подходит для стандартного случая, когда целью является обеспечение того, чтобы скульптинг не «просачивался» на другую сторону тонкой модели. Однако, изменяя кривую, вы можете влиять на то, как сильно маскирование применяется к вершинам, каким образом функция влияет на то, в какой степени нормали вершин указывают в сторону пользователя. Например, выравнивание участков этой Кривой позволяет производить ступеньки при лепке, поскольку диапазоны углов затем будут маскировать на ту же величину.


Перевод: Дмитрий Булка
rhino-help.com
Copyright <2017> by <pixologic.com>. Translate <2018> by <Dmitry Bulka> All Rights Reserved
A. Adding a new Brush Collection to Photoshop
There are two ways to add brushes to your system: make them or get them elsewhere.
Suppose you have downloaded a brush collection and want to use it. Here’s how to install this:
- First choose your Brush tool. Then click the drop-down arrow for the Brush Preset Picker. That’s the second label above, where you see the current brush sample.
- Click the flyout arrow in the circle at the top right on this box. One of the choices is Replace Brushes. Choose that and find your new brush collection on your hard drive. Click the Load button.
| TIP: If you choose Load Brushes from that flyout menu, Photoshop will add the new brushes to the current library. |
Importing .ABR files to Clip Studio Paint
Importing tools into CSP is just about one of the easiest things you can do! There are two ways to do it, so I’ll share both of those here. The first way is the “long way” — which is really just a few clicks, and the second is my preferred way of importing tools that aren’t coming from the CSP Assets menu!
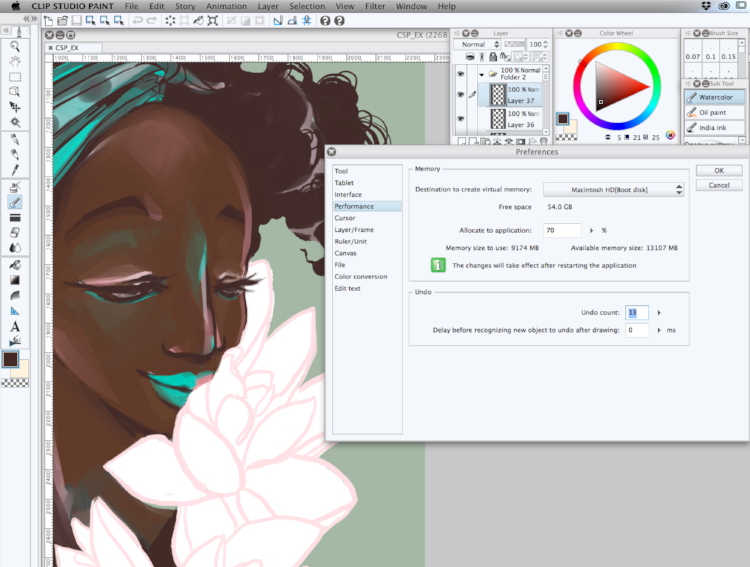
First you’ll need to decide what overall category of tool that you want to put your PS tools in. For this article, since I’m using brushes that are supposed to imitate wet media, I’m going to choose the “Brush” category. Then in the Subtool window, click on the three horizontal lines in the top left corner to bring up the menu, as shown below, and then click on “Import sub tool…”
Navigate to where you saved your brushes and select the ABR file you want to import. You can see in the following screenshot that I’m selecting the “Wet Media Brushes” abr file I created earlier.
Click on Open and CSP will go to work. If importing multiple tools at once, CSP will create a new subtool group to put the brushes in, as shown below.
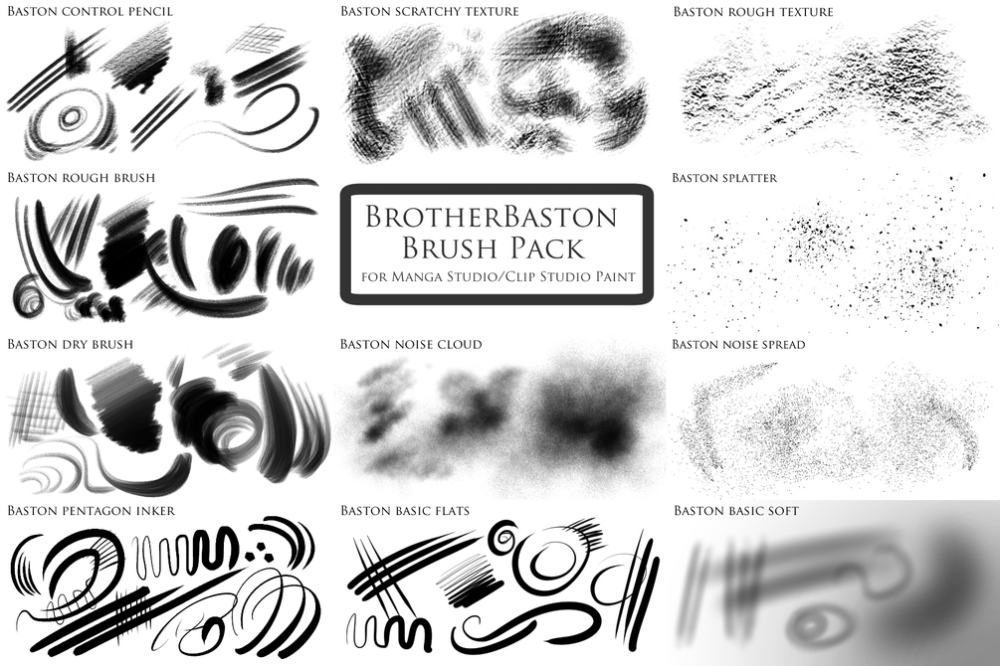
The other way to import tools is with a simple drag-and-drop procedure. For this example I am installing a set of Sumi-e Brushes from DeviantArt user noircat (
https://www.deviantart.com/noircat/art/Sumi-e-Style-Brushes-58459004)
https://www.deviantart.com/noircat/art/Sumi-e-Style-Brushes-58459004)
and will be installing them in the Decoration category. To get started, I select the Decoration tool category so that the Subtools are visible in CSP. Then, open the location on your PC where your photoshop brush file is stored and position it so you can see the Sub Tool window and the ABR file saved on your machine at the same time, as shown below.
Click on the file of tools to import and, while continuing to hold down the mouse button, drag the file into the Sub Tool window. When you’re in the correct spot the cursor will turn into a “+” symbol. Release the mouse button and CSP will import the tools. In the following screenshot you can see the Sumi-e category made in my Decoration tool.
Again, this process is not perfect. You may need to adjust the settings in the Sub Tool Detail menu to get the precise look you’re going for (like changing the opacity and such for a watercolor effect).
Now that we know how easy it is to import Photoshop brushes to CSP, let’s discuss the new brush options in this update.
F. Making a Brush Tool Preset
You’re working on a painting and have your paintbrush just as you want it. But you want to «grab» a different brush for another part of the project. How can you save the first brush, so that it will be available again?
In Photoshop (not in Elements 2) you have Tool Presets! You’re going to love this.
1. First, get your brush just as you want it — Brush Tip Shape, Spacing, Tip Size, Scatter, Shape Dynamics… whatever. You set these in the Brushes palette. (If you don’t see this, use View > Brushes.)
If it’s a brush that you will often use the same colors, go on and set your colors as you need them, along with the Color Dynamics.
2. Now click the dropdown for the Tool Preset Picker, the choice on the far left of your Options Bar.
3. Click the New Preset icon. If you want this Preset to remember your colors, click the box for Include Color.
4. Give your new Preset a descriptive name.
You can keep collections of Presets for various tasks, too. Use the flyout arrow on the Tool Presets window and choose Save Presets.
Now you can name this collection so that you can find it when you want to do this sort of work again!
You can delete individual Presets from a collection, if you want, as well.
So there you are! A great way to keep your brushes and tool presets organized!
Уроки Фотошопа
Глава 12. Рисование
Создание новой кисти в Фотошопе
- Щелкните по стрелке
в поле Brush (Кисть) и выберите команду New Brush (Создать кисть) из
меню панели выбора. - Выполните шаги 2-8
из раздела «Изменение существующей кисти», чтобы создать кисть.
Щелкните по кнопке Create New Brush (Создать новую кисть), если хотите
сохранить измененный вариант кисти, созданный на панели выбора. (Однако новый
образец кисти не попадет в какую-либо библиотеку.) Введите имя новой кисти
и щелкните по кнопке ОК. Пиктограмма новой кисти станет последней на панели
выбора. О том, как сохранить кисть в библиотеке, рассказано в главе 21, раздел
«Сохранение нового элемента панели выбора в новой библиотеке».
Удаление кисти
- Откройте панель выбора
кисти. - Первый способ: нажмите
клавишу Alt и щелкните по кисти, которую вы хотите удалить. Это действие нельзя
отменить!
Второй способ:
укажите кисть, которую хотите удалить, и из выпадающего меню выберите команду
Delete Brush (Удалить кисть) — см. рис. 12.10


![]()
Рис. 12.10. Удаление кисти
Восстановление
кистей, установленных по умолчанию
Кисти,
расположенные на панели выбора кисти в момент выхода из Фотошопа,
будут там же, когда вы снова запустите программу. Для восстановления библиотеки
кистей, установленной по умолчанию, из меню панели выбора выберите команду Reset
Brushes (Восстановить кисти) и щелкните по кнопке ОК.
Загрузка библиотеки кистей
В дополнение
к кистям, присутствующим в программе по умолчанию, вместе с Фотошопом
поставляется еще одинадцать библиотек кистей. Библиотеки Assorted Brushes
(Кисти в виде фигурок), Calligraphic Brushes (Каллиграфические кисти),
Drop Shadow Brushes (Отбрасывающие тень кисти), Faux Finish Brushes
(Кисти с изрезанными кончиками), Natural Brushes (Естественные кисти),
Natural Brushes 2 (Естественные кисти 2) и Square Brushes (Квадратные
кисти) были еще и в Фотошоп 6. Dry Media Brushes, Special Effect
Brushes (Кисти со специальным эффектом), Thick Heavy Brushes, Wet Media
Brushes -новые библиотеки, появившиеся в Фотошоп 7 (рис. 12.11-12.14).
Рис. 12.11. Библиотека Dry Media Brushes
Рис. 12.13. Библиотека Thick Heavy Brushes
Рис. 12.14. Библиотека Wet Media Brushes
- Откройте панель выбора
кисти. - Щелкните по стрелке,
расположенной на панели справа, затем в нижней части меню выберите имя какой-либо
библиотеки кистей. - Щелкните по кнопке
Append (Добавить), чтобы добавить дополнительные кисти к текущей панели
выбора, или по кнопке ОК, чтобы заменить текущую библиотеку кистей
новой.
Для
того чтобы найти и открыть библиотеку кистей, которая находится не в папке Adobe
Photoshop 7/Presets/Brushes, просматриваемой по умолчанию, выберите команду
Load (Загрузить) из меню панели выбора.
Interface
Элементы управления Brush Preset» из панели инструментов доступны только в том случае, если активен какой-либо из инструментов рисования», например Paint Deformation!!!.
Brush Preset Manager
Открывает диалоговое окно Brush Preset Manager», позволяющее добавлять, дублировать, переименовывать, удалять, сохранять, и подгружать предустановки для кистей.
Add New Preset
Добавляет новый «пресет» с текущими настройками из панели инструментов. Первое, что желательно сделать, это задать корректное имя для кисти. Если количество «пресетов» для этой панели превысит максимально возможное (50 шт.), диалоговое окно предупредит Вас об этом.
Каждый «пресет» доступен через соответсвующую кнопку с графическим представлением (в серых тонах) формы мазка кисти и его относительного размера. Если кликнуть на один из представленных «пресетов», он станет активным, а его настройки готовы к испорльзованию. Каждый «пресет» включает в себя все параметры текущего инструмента. Это могут быть инструменты (кисти) использующиеся в режиме Paint Deformation». Имя текущего «пресета» отображается при наведении на него курсора, одновременно с этим появляется подсказка, в которой прописано его имя.
Для деактивации «пресета», достаточно повторно кликнуть на панели инструментов,его настройки останутся активными, но их изменение, больше не будут касаться самого «пресета» (т.е. эти изменения не будут запоминаться в «пресете»).
По умолчанию, панель инструментов, содержит пять предустановленных настроек кистей. Но их может быть в 10 раз больше (50 шт.). Для использования желаемого «пресета», необходима его активация через панель инструментов. Пока текущий «пресет» активен, программа запомнит любые изменения, внесённые в настройки кисти и автоматически включает их в начале следующего сеанса программы.
При внесении изменений в размер кисти, кнопка с изображением активного «пресета» автоматически обновляется и отображает эти нововведения (по умолчанию до 40), а также при внесении изменений в такой параметр как Falloff», который на пиктограмме представляется в виде градиента. Настройку Falloff» можно производить в диалоговом окне Painter Options!!!.
Замечание:некоторые внесённые в текущий пресет» изменения по настройки кисти, взаимосвязаны с другими контекстно-зависимыми параметрами, напримерSize». Т.е. его изменение для текущего «пресета» повлечёт за собой такое же изменение этого параметра во всех остальных инструментах. Например, если в текущем «пресете» размер кисти установить равным 11.6, при переключении на любой другой инструмент, кисть будет использовать именно это значение для данного параметра.
____________________________________________________________________________________
Color Jitter
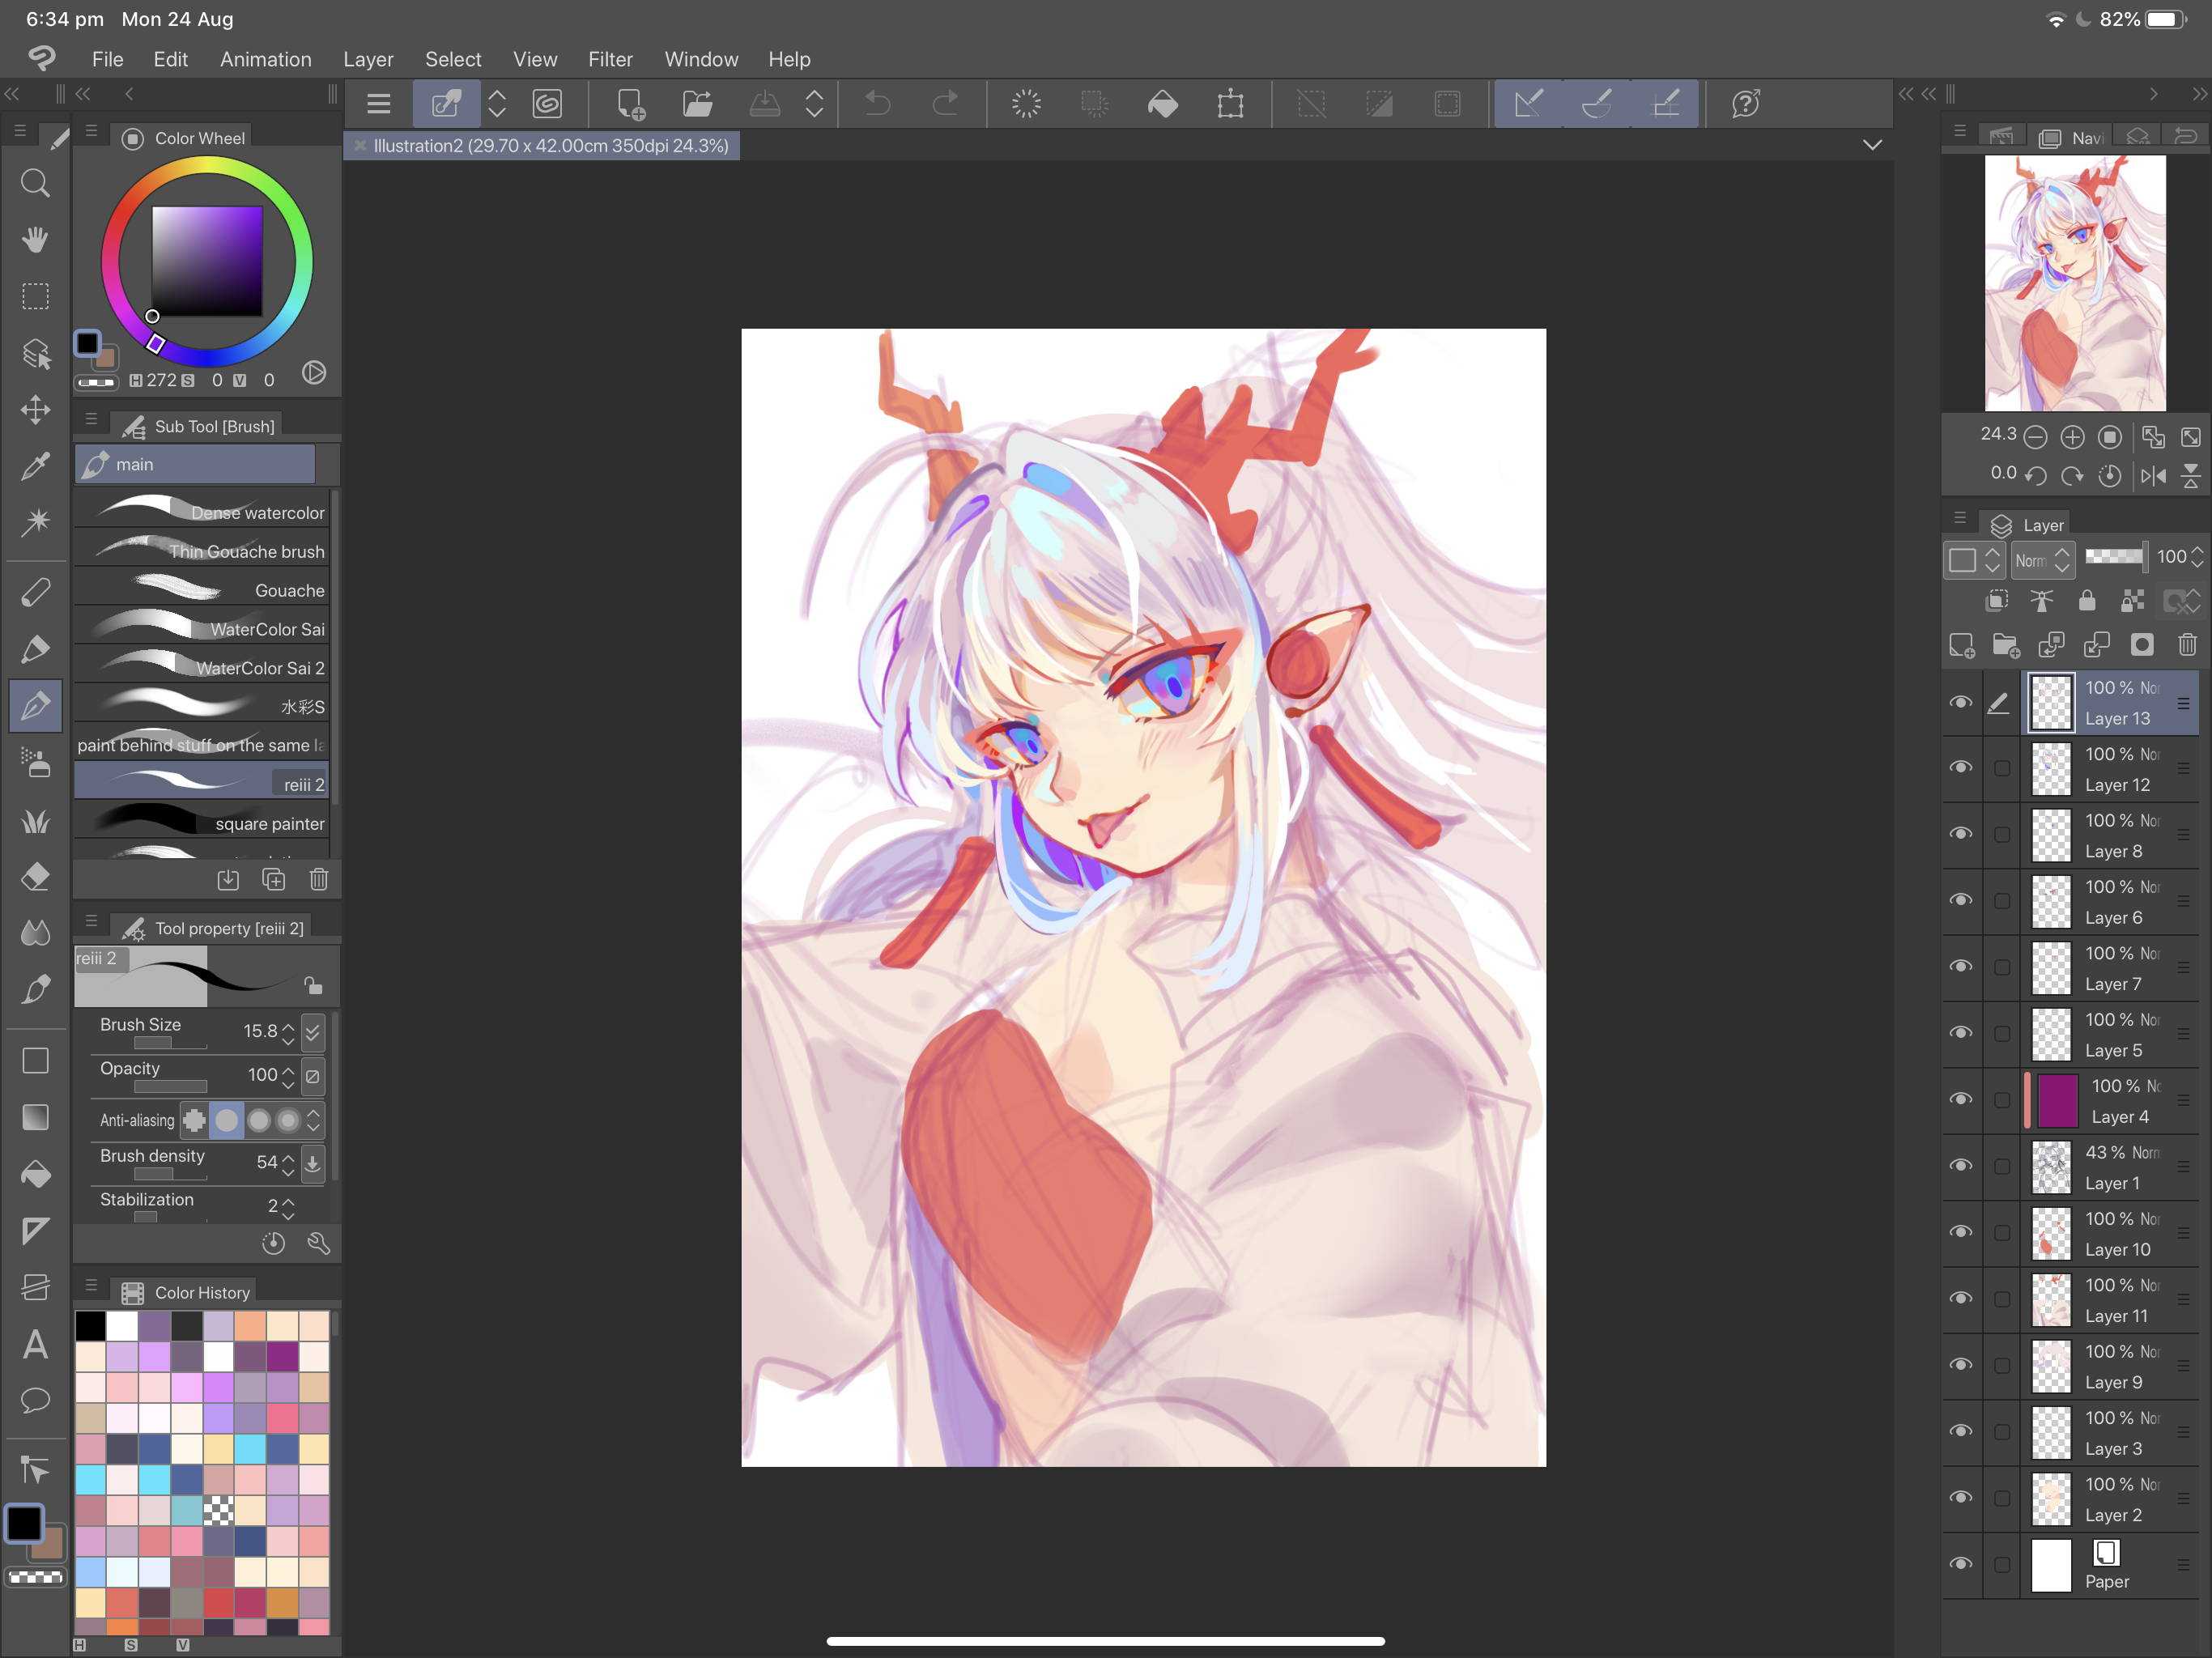
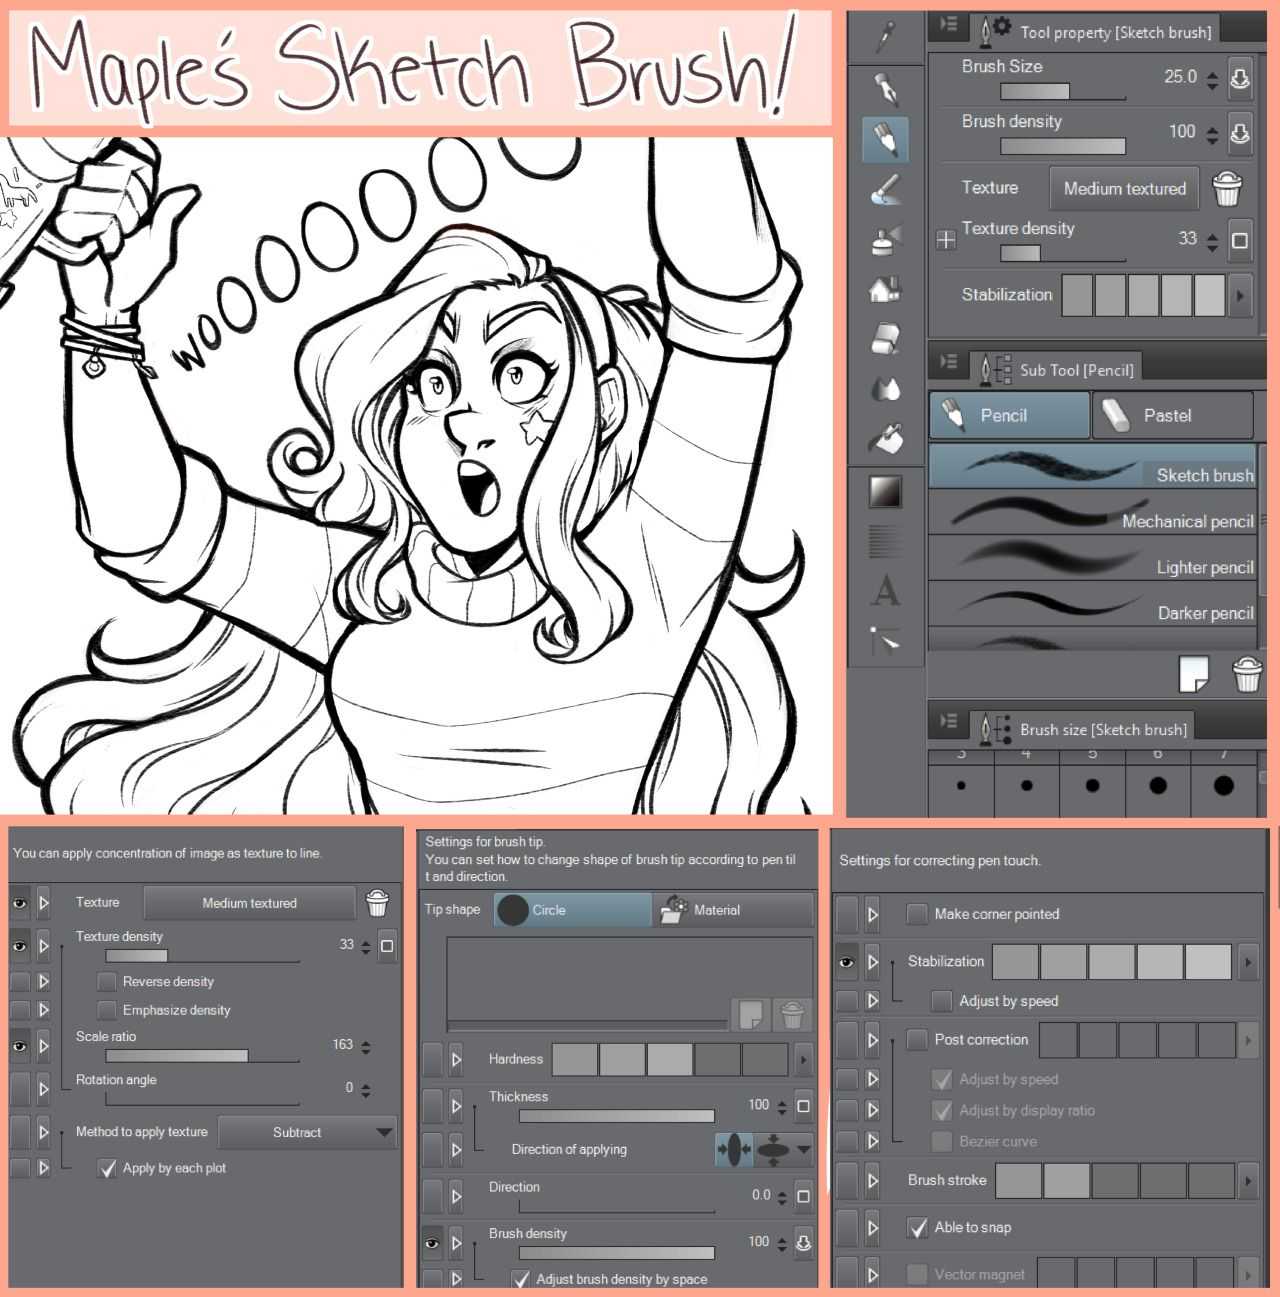
One of the new brush options in this Clip Studio update is called “Color Jitter” and they produce some truly unique effects! To get to these options, select the sub tool that you want to change the look of and then click on the icon that looks like a little wrench in the bottom right of the Tool Property menu. This icon is indicated by the arrow in the following image.
In the Sub Tool Detail window you will find all the options for personalizing brushes in Clip Studio Paint. The new options for this update are under “Color Jitter” on the left side of the window. Click on it and you will see the options in the image below.
These new options are called “Change brush tip color” and “Randomize per stroke”. You can turn the settings for either one or both by clicking on the checkbox to the left of the option name to activate it. Then use the sliders or the number entry for each option to change the settings.
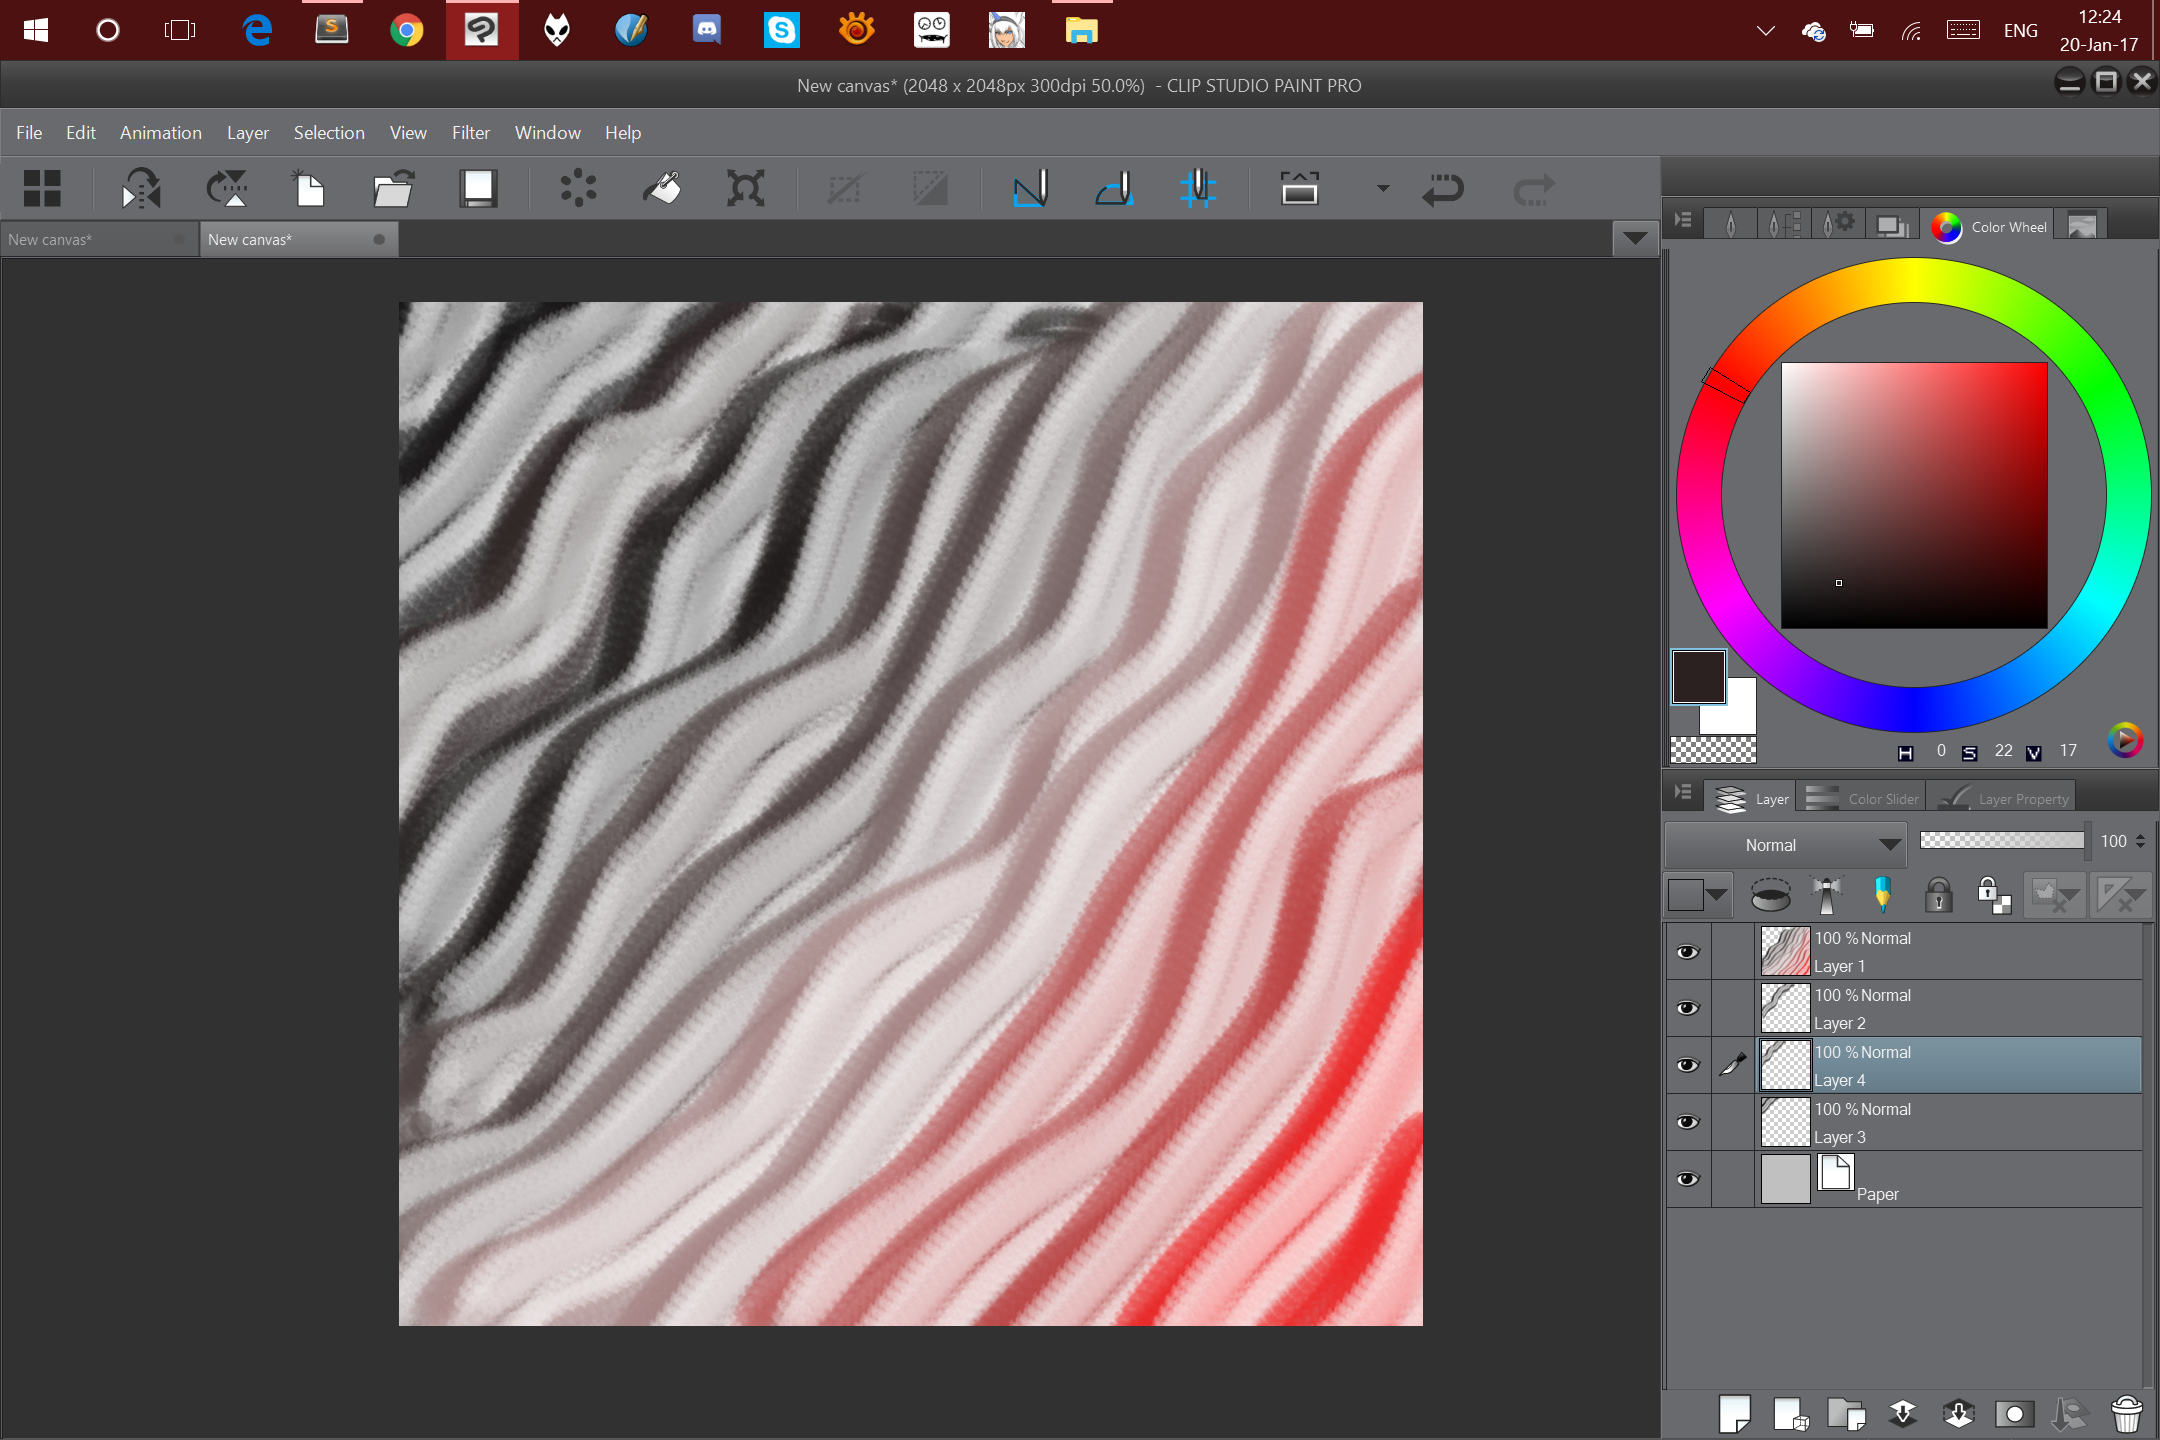
Each of these new options can control hue, saturation, or luminosity. The image below shows each of the “Change brush tip color” options for a brush turned up to the highest setting to illustrate what the setting does.
As you can see, the Hue setting introduces more colors into the brush tip. The intensity of these colors depend on the base color that you set, too! If you choose a very bright and saturated color for your “brush color” then the tip colors will be very saturated. If you choose a desaturated color as your active color, the random colors will be desaturated. Keep an eye on the brush stroke preview at the top of the Sub tool detail options window to see how the colors change as you choose different active colors.
The saturation option produces a stroke that has differing levers of saturation. In the example stroke above, all the dots in the brush stroke are blue, but some are desaturated to the point of being gray or white, while some are the full saturation of the blue color chosen as my brush color.
Luminosity controls how dark the color gets. Though I’ve used the same blue as my brush color in all the above examples, this stroke has dots that vary from blue to black instead of blue to white!
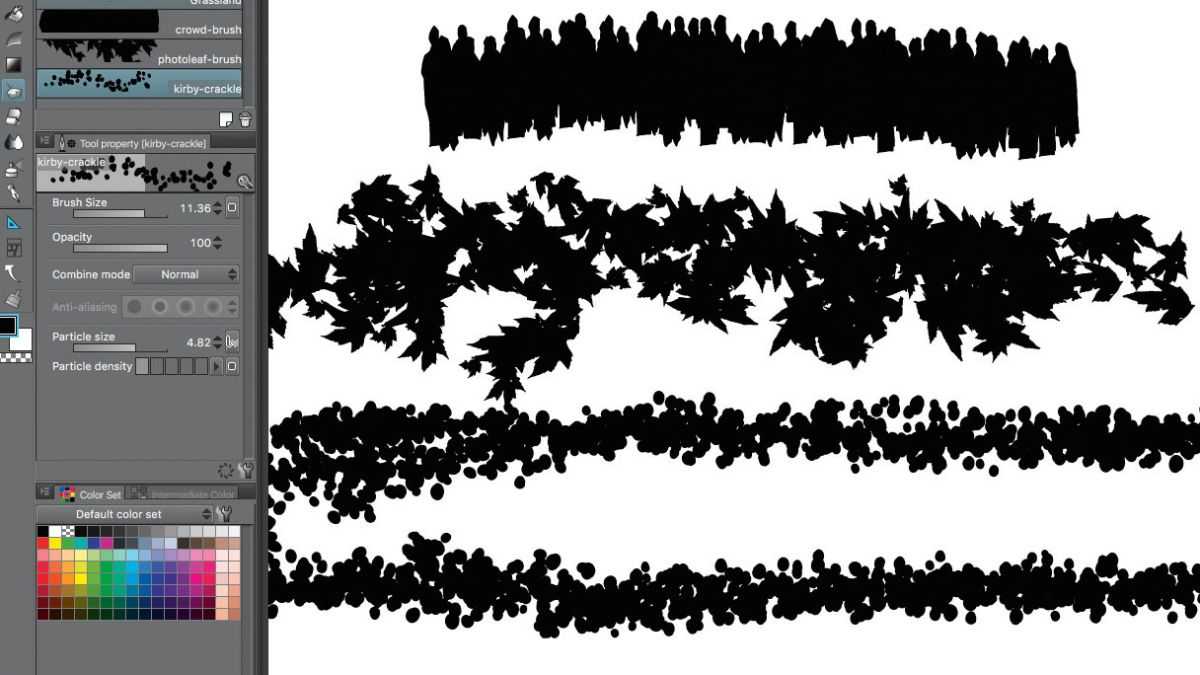
The Randomize Per Stroke settings have a very different effect, because they change every time you put down a new stroke of your drawing tool. The following image shows these options at their highest settings.
These options are in the same vein as the Change Brush Tip Color, but CSP picks a random amount with each stroke of the tool instead of changing the brush tip as the stroke is made. Each of the color blocks above was made by putting down multiple overlapping strokes of this brush.
By clicking on the icon to the right of each option’s slider, you can also pair each setting to certain parameters such as pen pressure, tilt, velocity, and random.
B. Adding a new brush to a Brush Library
You’ve just made a new brush! YAY! But then you realize that it’s in that generic Assorted Brushes Library along with all the others that you’ve made. How do you put it where you want it? The easiest way is to put it where you want it to begin with — that is, when you’re making the brush.
Here’s a habit which will help you on your way to an efficient Photoshop workflow: When you make a new brush, before you hit that Edit > Define Brush Preset, first replace the current brush Library with the one where you want this new brush to reside. (Do this just as you did in part A above. Click that dropdown and then the flyout and choose Replace Brushes.)
Procedures
Использование Brush Presets» на панели инструментов:
1. Активировать любой из выше перечисленных инструментов кистей;
Любой подобный инструмент изначально использует стандартные предустановки;
2. Клик ПКМ в пустой части панели инструментов. Например, на главной панели инструментов ниже выпадающего списка Named Selection Sets» и выбрать пункт «Brush Presets». откроется диалоговое окно с одноимённым названием:
3. Выполняем одно из следующих действий:
Кликаем по любому из представленных «пресетов», чтобы заменить ими текущую предустановку;
Изменить настройки кисти и кликнув на кнопку «Add New Preset» добавить в список новый «пресет»;
4. Рисуем этой кистью;
5. Если в настройки кисти (с текущим пресетом) внести изменения, они запомнятся между сессиями. Изменение общих для разных кистей настроек, например параметра Size» будет применяться ко любому инструменту.
6. Чтобы изменить имя пресета», скопировать его, сохранить/загрузить или удалить с панели инструментов, необходимо нажать кнопку Brush Preset Manager!!!.


Modifiers (Модификаторы)
Предварительный просмотр кисти Mesh Insert (Внедрение полигональной сетки)
Нажмите, чтобы выбрать нужную полигональную сетку. В данной операции могут быть выбраны только объекты из полигональной сетки. Примитивы не могут быть задействованы. Как только нужная полигональная сетка будет выбрана, она отобразится в миниатюре предварительного просмотра Mesh Insert (как куб, показанный на рисунке выше). Нажмите на миниатюру ещё раз, чтобы выбрать другую сетку.
MultiMesh Select (Выбор из нескольких полигональных сеток)
При выборе кисти InsertMultiMesh этот ползунок можно использовать, чтобы задействовать нужную сетку для вставки из списка возможных.
Variations (Вариации)
Слайдер Variations (Вариации) позволяет ZBrush варьировать выбор сеток из Insert Multi Mesh. Значение слайдера будет задавать количество сеток во вставляемом наборе из общего числа имеющихся для вставки. Имейте ввиду, что выбранная в текущий момент сетка будет стартовой.
Например, если у вас в наборе есть восемь сеток, включая выбранную в текущий момент, и вы хотите, чтобы ZBrush вставил их все, то вы должны установить этот ползунок на цифру 8. Параметр 5 заставит вставить текущую и ещё четыре сетки.
Чтобы задать нужный режим выбора сеток для вставки отрегулируйте должным образом ползунок Variations Select Mode (Режим выбора вариантов).
Variations Selector (Переключатель вариаций)
Слайдер Variations Selector (Переключатель вариаций) задаёт, каким образом ZBrush выбирает из множества полигональных сеток, когда активен лайдер Variations (Вариации).
0 = Static Selection (Статический выбор)1 = Cycle Forward (По кругу вперёд)2 = Cycle Backwards (По кругу назад)3 = Random (Случайным образом)
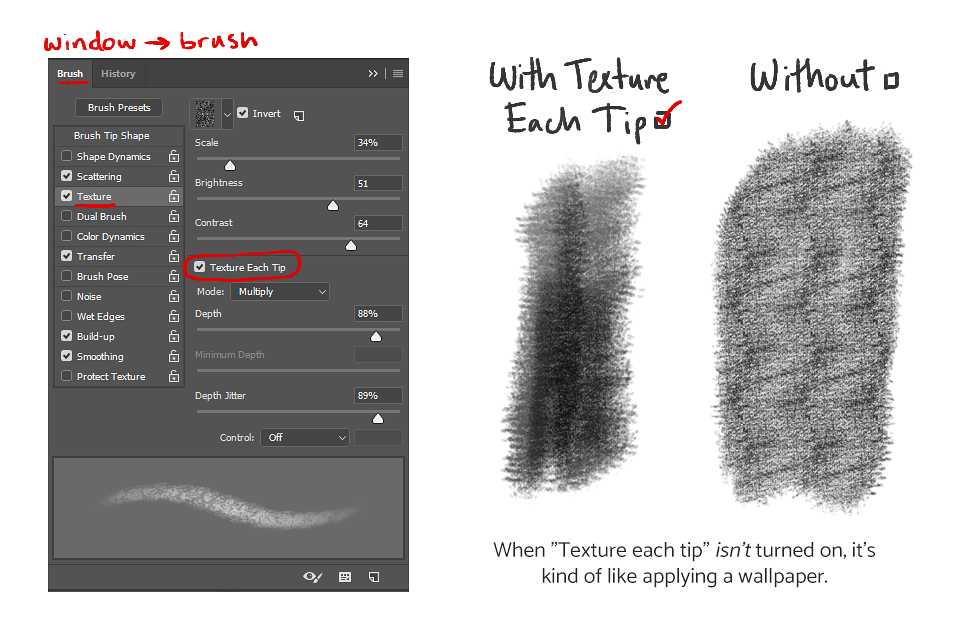
Texture Brightness/Contrast and Texture Mode
The final new options we’re going to look at are under the “Texture” heading on the left side of the Sub tool detail window. If you’ve never played with these options, they’re a great way to add, well, texture to your strokes! Unless you’re using a tool that already has a texture applied to it, you’ll need to load a texture first before you can play with the new settings. If there is no texture already set, the box next to the first option in Texture will say “None”, click on that word to select a texture from the installed Materials to apply it to the tool.
Once you’ve selected a texture from the Material library and head back to the Sub Tool Detail screen, you will see that all the texture options are now lit up. The options that have been added to this feature are Brightness, Contrast, and Texture mode, which are now new ways that the texture can interact with your stroke color and brush tip shape. In the image below I’ve used the same tool and color for each stroke, but have changed the texture setting.
Note how different each stroke looks just from changing one option! Remember that you can test the changes you’re making while you’re changing them by having a new canvas open and doing “test swatches” as you change the settings. I love doing this so I can see what an option does to the look of my brush! Being able to change so many parameters to get exactly the look you want from your tools is amazing and really lets you customize your drawings to match your style.